My search went out for a car that was solid and had a good body to start with.
In may 2011 we found a car that match the description and was a good base for a project.
We decided to get the car to Holland and in august 2011 it stood in Roggel.
The 1970 Mustang the way I got it... ugly basted !
The Plain Jane Sleeper,
What is a Sleeper ? A sleeper is a deceptively fast car that looks slow or stock on the outside while fast and very powerful at the traffic lights.
You might think, why Building a sleeper... ?? first of all and most important
because I like it but secondly because most of the cars you see have simply to much and so overkill.
My mustang needed to be
clean, to be smooth and with as little options as possible that are not
of any influence on
driving and safety.
PLAIN JANE !
Now, I could
have shaved that car with no door handles and all that stuff but no,
this might endanger another point... it had to look stock original! A
sleeper, looking stock and slow but it will surprise you when it hits the
throttle.
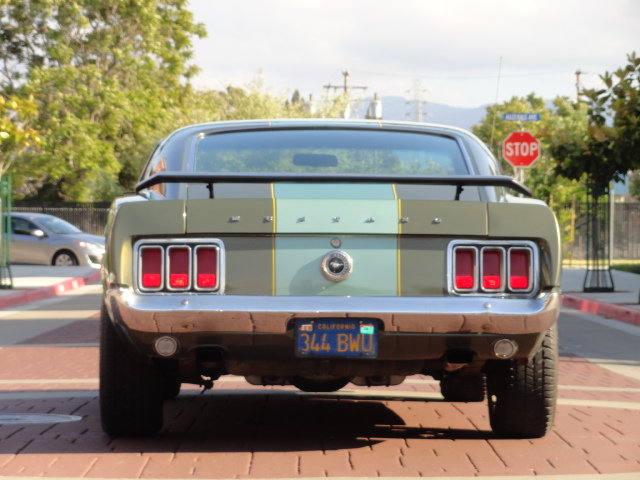
I admit that an coupé would have been a better choice as going for the sleeper look, but I love the fastback so much that an coupé was out of the question, besides a sportsroof has an higher value and is more sought after then a coupé.
What Jane does not have :
- Spoilers
- Scoops
- Louvers
- Antenna
- Flip open tank
- Dual exhaust valance panel ( bended below ) but will be replaced by boomtubes
- Sport mirrors - 1 stock mirror left
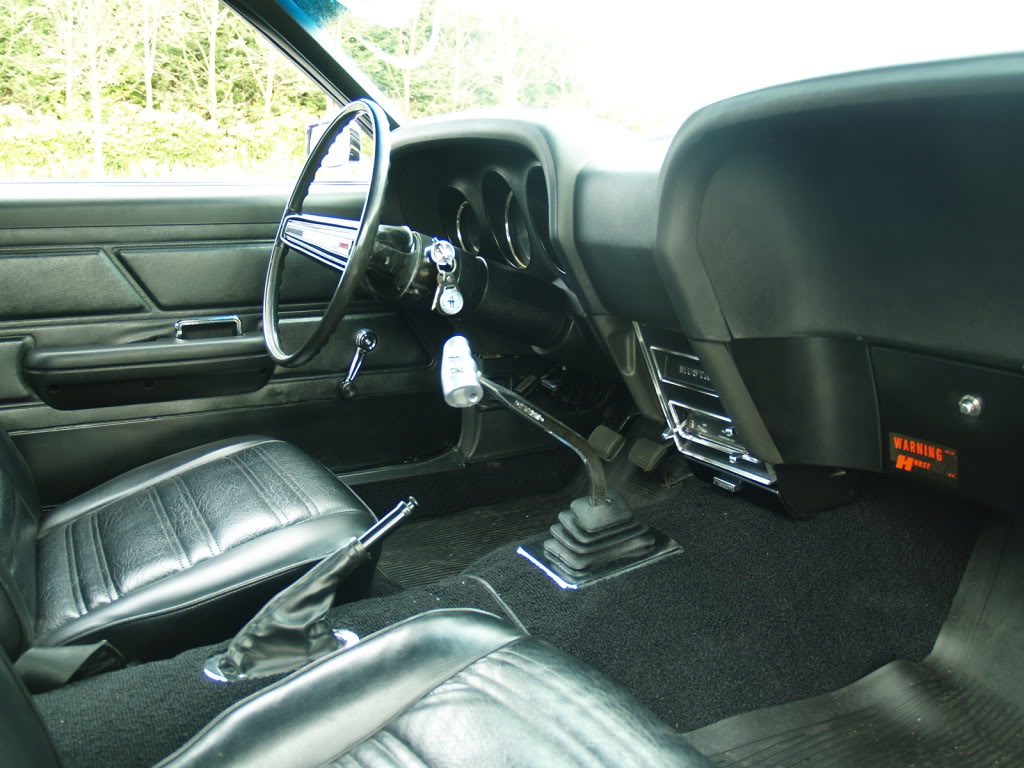
- Sport seats, it has stock seats
- Fold down rear seat
- Radio (extreme rare radio delete panel ! )
- Clock
- Deluxe interior
- Mid console
- Normal brake pads ( see power brakes )
- Air conditioning
Options and safety features it does have:
- Power brakes
- Power steering
- Very Very Rare Radio Delete panel !
- Hidden Tach - Vacuum & Water temp meter in glove comp.
- Manual Choke ( at least its there )
- Radiator duct panel to force more cold air through the radiator.
The car came from factory with a 302 2V engine with a C4 automatic driven by a 2.79 open 8" rear.
Not realy the stuff that makes heads turns so the entire drive-train had to go. That was the idea from the start.
Transmission:
First
we swapped the C4 for a 4 speed toploader with Hurst competition
shifter. A build that took because of some defect new ordered parts almost 2 days,
but was well worth the effort.
You might ask, why not a T5 or a 5
speed transmission... well, its not period and not oldskool enough ! I
like the way they thought in the 70's. "
shift as hard as you please, but don't break your arm "
I might do a 5 speed swap in the future, but for now the 4 speed will do the job just fine.
The 8" 2.79 rear end
The rear end:
The 8" rear was swapped for a 9" 28spl rear with a 3:50 traction loc.
The choice for a 3:50 was not made overnight. The RPM range around 60 mph
is a point that makes choices difficult. I was thinking of a 3:91 but
that would make it run around 3500 at 60 MPH, rather high.
Hubcaps:
A
nice wheel needs nice hubcaps and as you could have seen above, I
choose for the the stock Ford Motor Company hub caps. The problem was
that almost all of the hubcap sets where damaged, dented or even bended
so it took a while to find a set. I wind up buying 7 sets for making one
perfect sets. In the end I found a set of NOS dishes for the WOW factor
! See the wheel and tire links for the rest of the wheel story.
SAFETY FIRST !
As
you might know the first generation mustang was know for a lot good
facts but also for a design flaw. The fuel tank that was located in the
trunk and made also the trunk floor. In a rear end collision the
chance of a fuel tank burst was very high. There for we decided to make a
tank armor.
A 4mm thick steel was bended in for to fit the tank. I
decided to pat the inside with isolation to prevent damp. The tank
armor provides safety, a stagger rear and some extra weight on the rear
end.
It is all in the details...
In my opinion, the beauty of a car is all in the small details. You can build a car with any after market part and steel the show on you local meetings. Well, you could ! And hey, many people would get a hard on of all that chrome and
(ton) bling bling crap ( sorry for saying ). But if you start looking at cars you might find that the ordinary looking car has sometimes more to give then catches the eye.
If you take a look at my plain jane you might find a couple of cool details that you would have missed when you walked past it to blind your eyes with the next chrome bucket.
The car has a couple of cool decals from the 60's, no stickers but only the original waterslide decals that would have been on there in the 60s and 70s.
Also, if you look in you might find a choke cable... but it has an electrical choke ??? yes... like I said, its all in the details !
Also, under tha hood... you can find an steering oil cooler that was original to the BOSS 302 with power steering. Does it need it for "normal" street use... ? No !! Does it look cool ? Yes !!
Then, if you look a little higher you might find a Rev Limiter, also... this one you would fine on an original Boss 302. But, I have to say that an original working REV limiter would go on Ebay for more then 1000 dollars so I choose for a non functional limiter that has the looks, so again.... details.
Is my car made to look like a Boss ? No... not at all. I don't like clones or fakes or copy's from other cool cars although I have to admit that the concept of a plain jane caught my attention in a article I ones read. What I want is my car to look the way it could have looked in the 70s and do my best to give it that cool oldskool race look.
So... back to the meeting. On an average meeting, you might find that 9 out of 10 people would stay looking at that car with the big wheels, the customs mirror and that flakey paint job that flickers in the sunlight and the chrome valve covers that make you reach for your sunglasses. But normally, the longer you look the less you see :D
the 1 out of 10, or less, that stops to look at this type of car will respect the oldskool way and will find out that the longer you look the more you'll see.
Here a picture of the seldom seen radio delete panel / radio block of plate !
Why need a radio if the biggest stereo is between the shock towers ?
I was looking for a NOS panel for over a year and just when I thought I would never find one, I found a very nice ( like I said NOS ) panel on the almighty Ebay. Of course I had to go very deep in the pocket to get it but once your hooked...


