Tuesday, December 24, 2013

The New Engine bay


Also, a few pics from the new engine bay.

I can also tell you that there plans made for a cool youtube film early next year. Location is arranged and the plans are set.
 For now, just some more pictures of the 302 Clevor Engine


Oil sensor extention tube


Hey Guys,

It has been a while since my last post on the blog.
I have been very busy these last months, but not with the Mustang.
Anyways, a few things got done that where troubling me.

One of these things was the fact that the oil-sensor location caused me some trouble. The original location, in combination with the extention tube, got mixed ut with the placement of the steering pump on the heads. So we decicieded to place two tubes temporary for a fit.
Finaly, I order a sending unit kit, from the web and got busy.


The hose that came along with this kit was very stiff and does not bend that easy. The original way, got me still in some trouble. The hose would be in distress and might rupture some day. I decided to drill up the bracket so I could angle the mount a few degrees. And, it worked out just well !


Saturday, September 21, 2013

Installing the Clevor Pt.2


After a short recess of about 2 weeks while waiting on parts we regained hope and courage to finish the job...
Getting the parts here in time was a challenge, but so was almost everything in this build.
While installing we made a list of all things that did not fit:

  • Alternator
  • Steering pump
  • Steering pump hoses
  • Headers ( see headers on a clevor chapter )
  • New 24inch radiator and the hoses
  • V-Belts
  • Equalizer bar
  • Exhaust in combination with the steeroids kit
  • Steering Cooler
  • Back-up switch bracket ( not clevor related )
  • Manual starter ( needed an automatic starter )
  • Drive shaft 
  • and all the rest we forgot :) 
 the back-up switch


Still more then enough ground clearance !


After installing the new Sanderson shorty Headers on the clevor, with some additional fixing to be read in the headers chapter, we where quit convinced we where going for the top.
There was still a lot of work to be done like installing the cooling system, the fuel system and all that kind of work while Michel was working on the exhaust.
All in all it went pretty well considering the first build.


On 8:34 PM we where ready to give it a try. First without ignition to pump the oil through the block.
After pumping the oil and checking the oil of the steeroids set we decided to fire it up.
It fired right up, but after turning the key back to the run position it instantly died on us.
Driving us insane for about 2 hours of searching and checking from firing order to wiring problems we found out that there was a loss in connection between the ignition switch and the coil that was there while in the starting position but disconnect as soon as the key turned back to the run position.
Not sure where this error was coming from we wired it from key to coil and it instantly ran and kept running. YEAH, Time for a beer !

 bad quality video and only a few seconds but the sound of the engine mad our day !


Because it was already 1:00 AM we only came so far of running if to about 5 minutes to heat it up ,letting the air out of the cooling system and drove it back and forth to check the clutch. It all worked well.


Friday, September 13, 2013

HEADERS ON A CLEVOR !

HEADERS ON A CLEVOR !

Well, this subject kept me up at night... 
What kind of exhaust will I put on my Clevor, what would be good and what would be bad.
Because the Clevor engine has basically the same V-shape as a Boss302 I decided to go with the Hooker Super Competition longtube Headers for a MT Boss302 ( not that there are automatic boss302's but okay

Point to consider:

  • Manual or Automatic because of Z-Bar location
  • Manual or Power steering 
  • Long Tubes - Shorties or stock manifolds
- Manual or Automatic transmission.

A manual transmission have a lot of pro's but also a few con's.
A great con in an oldskool set-up is the Z-bar / equalizer bar that needs a pivot point on the engine block mount. That means that the Z-bar needs to cross between the chassis and the engine and needs clearance to move free. MAJOR IMPORTANCE !
The Hooker header gave trouble with the original Z-Bar, but might have been better with the Boss bar, we have not tried that so this might work just fine.
Of course you can get an cable linkage or fluid type but hey... OLDSKOOL !


- Manual or Power-steering

In my case a major problem, if I held the original power steering the problem might have been a little less but anyway... with a steeroids rack & pinion set up it a BITCH ! The Hooker long tube headers WILL NOT fit, don't even try they wont fit.

We hammed the shit out of the tubes just to bent it... will - not - work !


Long Tubes - Shorties or stock manifolds

As you have read I choose the Hooker Super Competition headers Long Tubes headers because that where the closets thing to the Clevor shape, a Boss302.  351C headers would be okay but that was not my first choice. He who knows it all.........
There is enough to be read on the net about the pro's & con's on shortys and longtubes and of course the stock manifolds so I'm not going to discuss that.
Lets say the stock manifolds would gave us no problem at all, these where not an option on a performance engine. That would squeeze the performance with more then 25% and that's to much.
As you might have seen while building the headers gave us plenty of trouble so we decided to ditch these long tubes and order a set of shorty headers.
Great news, no one in Holland has them for sale and with an very short deadline we need to move fast ( and pay the price ! :D ) 


I found a set of shorty's on Sanderson Headers for a 351C 4V with reducer plates.


Part 2.

After receiving the Headers from Sanderson we picked up the build with the new parts.
( you can read this in installing the clevor pt2 )

Immediately after lowering the block back into the mustang we noticed that we had some new trouble.
It did not fit proper. The passenger side header made contact with the lower part of the shock tower ( where the motor mount is attached to ) and the rear part of header hit the quicktime bell-housing.
After some motivation with the hammer and improved the flow on it the back part did fit. the lower part need a little grinding.

 The collector hitting the bellhousing just a bit.
 with the exhaust connected.

Why didn't those headers fit you might ask ??
A Clevor has a different deck-height then a 351C Cleveland engine so the headers would be just a few Cm's ( Europe ) higher then on a Boss-style engine. The V-shape and the deck-height are of great importance to the header and exhaust location.

The Driver side did fit quit well, except for the fact that the collector and reducer where located on the worst place you could wish, just behind the steeroids set. This took some expert welding skills of my friend Michel to make this fit ( thanks for that Fransje ). 
The location of the collector is also of great importance to the equalizer bar. In our case we had to place the bar on an angle to leave clearance for the clutch. The fork pin as also place on the opposite side of the Z-Bar because the normal side gave also trouble with the headers.

 here you can see the collector behind the bellhousing.
 Just over the steeroids set with some additional wrapping to prevent melting.
 Here you see also the Equalizer bar with the springs and its tight fit.

All things considered we came to the following conclusion.

"Nothing fits normally on a clevor engine and its quit a challenge to make everything fit properly. 
There are NO headers on the market that will fit on a clevor with a steeroids steering set and a equalizer bar without some extra care. With a normal power steering or even manual transmission it would be a hell of a lot easier and I would suggest to go with a cable of hydraulic clutch in stead. "


Niels


Boxing Lower Control Arms


Boxing Lower Control Arms,

Last winter I swapped my old ( Original OEM ) control arms, springs and all to a set of new control arms from my best friend Scott Drake ( NOT!!! ) 
( You must give the man credit for getting it done to make nothing right and nothing ever fits the first time... job well done FOOL )
Anyways, I had my old lower arms and preshed laying around in the shed and gave me the idea to box them the same way as the Bud Moore cars in the 70's Trans Am Mustangs.

A forum member of the dutch Mustang and Ford forum does all kinds of welding stuff so we had contact about boxing these lower control arms. He did a great job.
Before sandblasing the hell out of them...

 After sandblasting and the first layer of hammerite paint ( oh I love hammerite ! )

The rest... 


And the result !

The drive shaft

 The Drive Shaft,

Because I changed the 8" 2.79 to the 9" 3.50 the drive shaft comes closer to the transmission then before.
This causes trouble to the tail sealing of the toploader. The seal keeps rubbing on the rough area on the yoke witch causes leakage.
There fore the drive shaft needed to be shortened and balanced.

After that I gave it a custom touch to make sure there are no others then mine around :)

 Currently, the seal of the tail section rubbed on the black area on the yoke.

 The yoke renewed and polised 
plus a custom made 302 Clevor on the shaft :) 

 Special custom detail "Chicken Wings - by Fransje". ( inside joke / yoke haha )

Friday, September 6, 2013

Installing the Clevor Pt.1


Hello ya'll,

On September 2nd we started installing the Clevor engine along with some other upgrades.
Our to do list where the following

  • Steeroids Rack & Pinion installation with stock column
  • Modifying the steering pump brackets for the stock pump
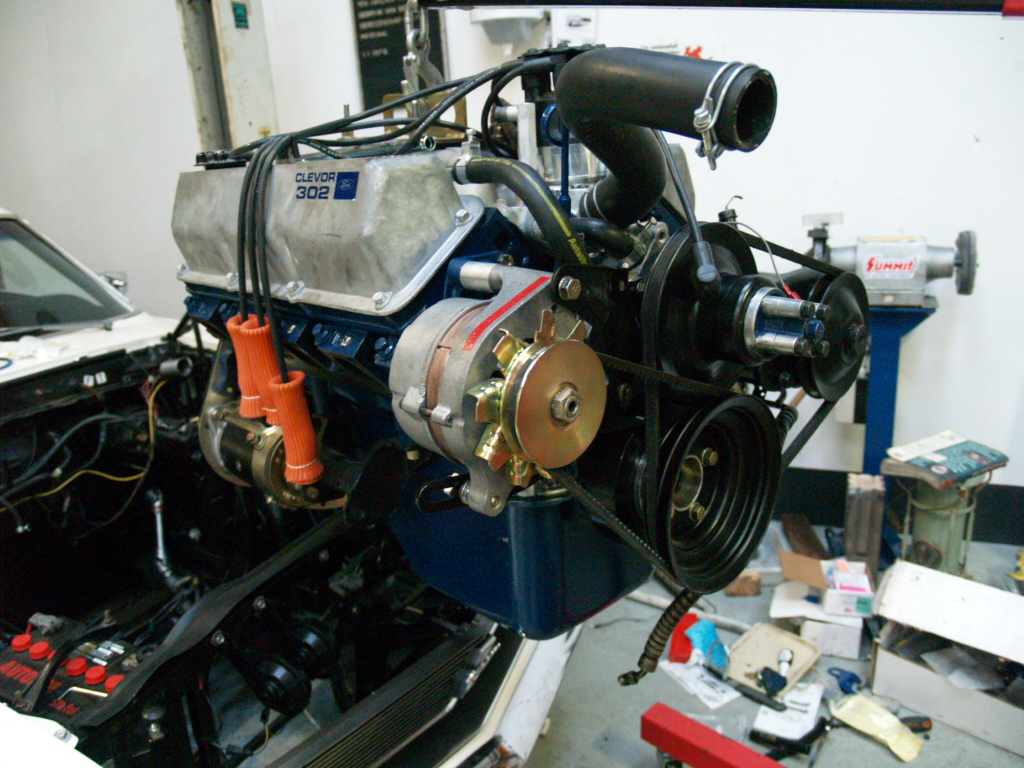
  • Installing the Clevor engine.
  • Installing the new clutch / Flywheel and bellhousing
  • Changing the Z-bar placement on the engine. 
Of course, we started removing the old engine and the toploader


After that, we started removing the steering system and column.


We installed the Steeroids set and shortened the original column by using the original shaft and shortened the collapsible system. 


The steering brackets for an windsor or cleveland engines aren't different but the bolt location on the heads are and the angle of is are entirely different. This causes trouble ! Lots of trouble !!!
Thanks to my friend Michel also this comes to a good end although its not the most pretty solution :)  
Here are a few pictures of that part... 


what a pretty way to fit the dip-stick ! ! 


 The Hays 157 Tooth steel-Flywheel.
The RAM-Clutch 

The Quicktime bellhousing and the ARP bolts.
( note: the ball-bearing is not for my toploader )

Okay, all went well so far... not all, but lets just say all went well. 
But then the trouble started hitting us from all possible sides.
First, the starter ( for manual transmissions ) we pulled out from my previous set up just did not fit into the hole in the spacer plate, jussssst great. We had to leave town to buy a new starter that fit the hole, an automatic starter. Of course I had to pay the top bill for a crappy starter without even knowing this will work ! ! !


But... if that was all I would only have scratched my head... but no


The Hooker - Super Competition Plus headers that are for a Boss 302 did not fit... NOT AT ALL ! 
Okay, we knew that it would give trouble for the Z-Bar because its just not a Boss. But the V-shape of the engine is exactly the same so we did not see much trouble in that.
The Steeroids set gave all the trouble, it hit the installation on the outside and so on so on... 
We had to battered and beaten it up quit bad to fit along the steering rack and all... 
It just did not fit, the block did not fall in to place, we had to bend it, bow it along the sides and all that crap. After more then 8 hours ! ( YES 8 HOURS !!!!!! ) we decided this would not do the job.
"Close, but no Cigar".
We pulled the engine out and in over 10 times to "adjust" the headers but no... they just did not fit !
Here it hits the framerails...

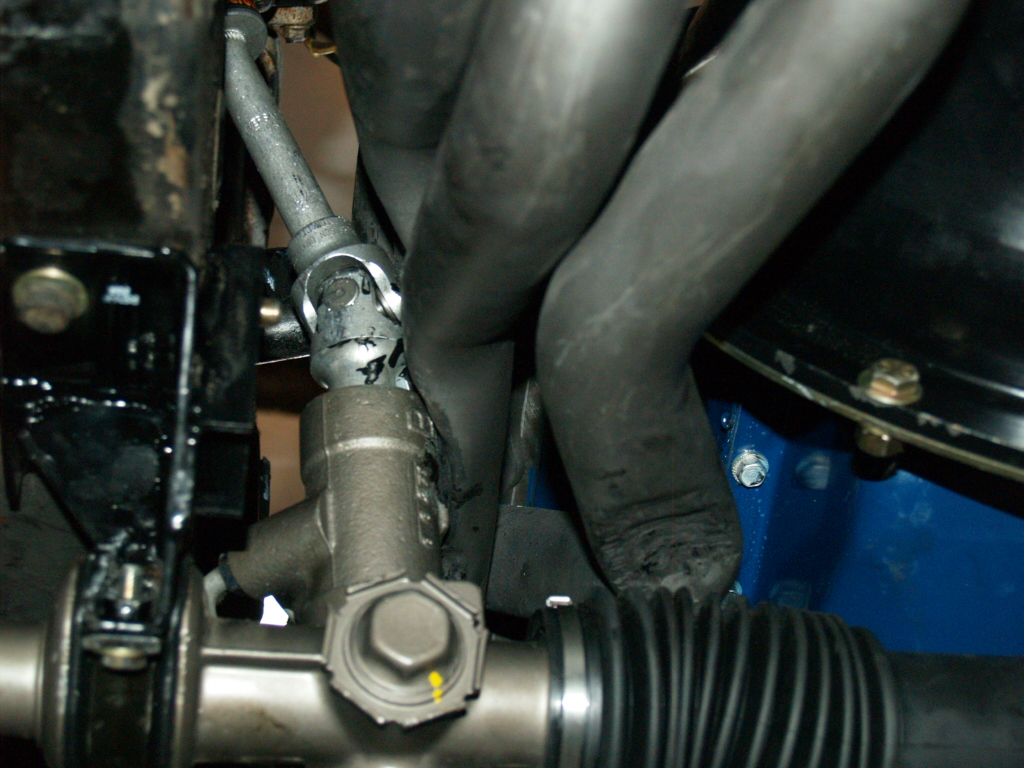
Here you see the bending of the down pipes to clear the steering... :( 

And around the steering side.

We decided to order a set of 351C 2V Shorty Headers from Anderson Headers down in South San Francisco. 


Because we got stuck on the headers we continued to some other parts that needed attention.


Now... its waiting on the correct parts and then we continue with the upward part to the top !

 Keep you posted ! please subscribe !